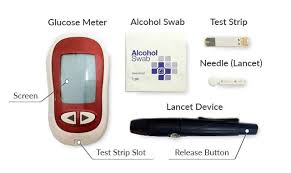
A glucometer (or blood glucose meter) is used to measure the amount of glucose in a small sample of blood, usually from a fingertip.
It can help you understand how your blood glucose levels are affected by food, exercise, medications and illness if you have diabetes and have been advised to monitor your levels at home.
It is important that you use a glucometer correctly. If you do not do so or if your strips have been damaged or your finger is dirty you may get a faulty reading.
This guide will show you how to use a glucometer, when you may want to check your blood sugar levels, how to understand your readings and how to deal with any unusual readings.
Your healthcare professional should advise you on how regularly you should be checking and your individual blood glucose targets. You cannot use a glucometer at home to diagnose diabetes or prediabetes. An appropriate blood test will be needed by a medical professional.
Learn more about diabetes tests and diagnosis from the NIDDK.
Article Index
- What Is a Glucometer and How Does It Work?
- Why Is Blood Glucose Monitoring Important?
- Supplies You Need Before Testing
- How to Use a Glucometer: Step-by-Step Instructions
- When Should You Check Your Blood Sugar?
- Understanding Your Blood Sugar Numbers
- What Can Affect Your Glucometer Readings?
- How to Improve Glucometer Accuracy
- How to Record and Use Your Results
- When Should You Contact Your Healthcare Provider?
- Frequently Asked Questions
- Key Takeaway
- References
- Learn More About Our Standards
What Is a Glucometer and How Does It Work?
A glucometer is a small device which can be used to measure the amount of glucose in your blood by applying a drop of blood onto a compatible test strip. This will interact with the glucose in your blood and produce a reading on your glucometer, usually this will happen quickly.
Some glucometers have memory functions. Some can also be connected to your phone or computer to make it easier to see trends with your healthcare team.
The glucometer will only give you an instant reading. It does not show how your blood glucose levels are fluctuating throughout the day. You won’t know everything about how well you are managing your diabetes from just one reading.
A Continuous Glucose Monitor (CGM) uses a sensor to regularly measure the glucose levels in the fluid underneath your skin. If you use a CGM, follow the instructions provided with your device and your healthcare team’s advice about when a finger-stick measurement may still be needed.
Why Is Blood Glucose Monitoring Important?
Monitoring your diabetes can help you and your healthcare team make sure that your diabetes management plan is working well.
Depending on your circumstances, checking your blood glucose may help you:
- Identify high or low readings.
- Understand how meals and physical activity affect your glucose.
- Recognize patterns at particular times of day.
- Review the effects of prescribed diabetes medicines.
- Make informed decisions with your healthcare professional about your care plan.
Some people will need to monitor their blood glucose more frequently than others. Depending on your type of diabetes, medication, risk of hypo and personal treatment goals you may need to check your blood glucose multiple times per day.
For more guidance, read the CDC’s guide to monitoring blood sugar.
Supplies You Need Before Testing
Gather your supplies before starting. Having everything ready makes testing easier and helps prevent mistakes.
You will generally need:
- A glucometer that is in good working condition.
- Test strips designed for your specific meter.
- A lancing device and a new, sterile lancet.
- Soap and water for cleaning your hands.
- A notebook, logbook or compatible app for recording results.
- A suitable container for disposing of used lancets and other sharps, following local guidance.
Refer to your meter’s instruction manual to check if there are any further requirements. Make sure that your strips are not past their expiry date and have been stored correctly. Strips may be damaged by moisture, high temperatures and incorrect storage.
How to Use a Glucometer: Step-by-Step Instructions
The meters may vary slightly and you should always follow the instructions for your particular meter.
Below is an example of how to carry out finger stick tests:
Step 1: Prepare the meter and test strip
Place your meter on a clean, dry surface and ensure there are enough batteries or that the meter is ready to use.
Remove a test strip appropriate to your meter and check the expiry date. Insert the strip according to the manufacturer’s instructions. Some meters will turn on automatically.
Do not use expired, damaged or improperly stored test strips.
Step 2: Wash and dry your hands
Before testing, wash your hands with soap and warm water and dry.
This will help reduce any contamination from food, sugar or other substances adhering to your fingers. This can affect the test. It will also help prevent any interference with the blood sample due to damp hands.
If your hands are cold and you are finding it difficult to get a sample then you may want to warm your hands slightly. If you use an alcohol wipe to clean your hands, ensure your skin is fully dry and follow the instructions for your blood glucose meter.
Step 3: Prepare the lancing device
Insert a new sterile lancet into the lancing device. Follow the instructions on the device. You may need to adjust the depth. Some people will get enough of a sample using a shallow depth.
It is best to prick the side of your fingertip as this can be more comfortable.
Do not use your lancing device or lancets or home blood glucose meter with anyone else.
Step 4: Obtain a small drop of blood
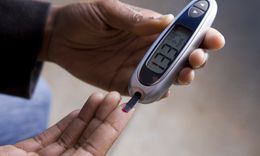
Use the lancing device to prick the side of your fingertip. Allow a small drop of blood to form.
Do not press down hard on your fingertip as this will impact the sample and therefore your result. If you have difficulty obtaining enough blood, warm your hands gently and follow the instructions supplied with your meter. Avoid squeezing the fingertip forcefully.
Step 5: Apply the blood to the test strip
Place the end of a test strip into the blood drop as instructed by your meter. Different test strips require different volumes of sample.
Apply the correct amount of blood. Do not spread blood on the strip. Only add extra blood if your meter instructions state that you can do so.
Step 6: Wait for the reading
Wait for your meter to analyze your sample. You will see your blood glucose level displayed on the screen. This usually takes just a few seconds.
Depending on what type of meter you are using your results will be displayed in either mg/dL or mmol/L.
If you get an error message on your meter do not guess what your result was. Check your user manual and follow the instructions. If you are told to try again using a new strip do so.
Step 7: Record the result
Record what you have read, when and any relevant information such as if you took the test before or after eating, after physical activity, whilst ill or after taking any prescribed medication.
This can help you spot patterns over time and will make it easier to discuss with your healthcare team.
Step 8: Dispose of used supplies safely
Ensure that you safely dispose of the used lancet in a sharps bin, and dispose of any test strips as instructed by the manufacturer and local waste disposal guidelines.
Follow the instructions for cleaning your meter. Ensure that it is stored correctly with supplies as recommended.
When Should You Check Your Blood Sugar?
You should check your blood glucose levels at certain times depending on your treatment.
Your healthcare professional may recommend checking your blood glucose:
- In the morning before you eat.
- Before meals.
- One to two hours after the start of a meal.
- Before or after exercise as advised.
- Before going to bed.
- When you are feeling symptoms which could be a sign of your blood glucose level being too high or low.
- When you are unwell.
The timing and frequency of testing depend on your individual circumstances. People using insulin or other medicines that can cause low blood glucose may need a different monitoring schedule from those whose treatment carries a lower risk of hypoglycemia.
Ask your healthcare team how often you should be checking, what results you should be reporting and what to do if your levels are out of your individual target range.
Understanding Your Blood Sugar Numbers
Your reading must be interpreted in context. A single result does not necessarily mean that your diabetes management is going well or poorly.
For many nonpregnant adults with diabetes, the American Diabetes Association gives these general glucose targets:
| When Blood Glucose Is Checked | General Target for Many Nonpregnant Adults |
|---|---|
| Before meals | 80–130 mg/dL |
| 1–2 hours after the beginning of a meal | Below 180 mg/dL |
Note: These are general targets, not universal goals. Individual blood glucose targets may differ depending on health, age, treatment, pregnancy status and risk of low blood glucose. Follow the targets recommended by your healthcare professional.
These are general goals. They can vary depending on your health, age, treatment, whether you are pregnant and risk of hypo. Please follow the goal set by your healthcare professional.
A blood glucose reading below 70 mg/dL is generally considered low. Hypoglycemia can be serious, particularly for people taking insulin or certain other diabetes medicines. Follow your personal plan for treating low blood glucose and contact your healthcare team if low readings occur repeatedly.
For more information, see the American Diabetes Association’s guide to checking blood glucose and the CDC’s guidance on treating low blood sugar.
Do not alter your dose according to general information given in this article. Follow the individual advice given by your prescriber.
What Can Affect Your Glucometer Readings?
Your blood glucose will naturally fluctuate through the day. Knowing how some of these factors can affect it will help you understand your readings.
Food and meals
Foods and drinks containing carbohydrates can cause an increase in your blood glucose levels. The quantity and timing of your meals, as well as the types of foods you eat and how these are combined, may all have an impact on your readings.
You may find it helpful to compare your readings taken around the same time (for example pre-meal and post-meal at the recommended time by your care team).
Don’t automatically assume that if you get a high reading that certain foods aren’t suitable for you. If you notice any patterns, talk to your healthcare professional or dietitian.
You can also read our guide to low-glycemic eating and diabetes.
Physical activity
Physical activity can help to reduce your blood glucose levels. This can depend on what type of activity you do, how long and how hard you are exercising, and also what medications you are taking. Sometimes more vigorous activity can actually cause a temporary increase in glucose levels.
Keep a note of any readings that you have been advised to check by your healthcare team. If you are experiencing frequent lows or unexpected changes talk to your clinician.
Stress, sleep and illness
Stress, disturbance to sleep, infections and other illness can all affect your blood glucose levels. Some people find their levels rise when they are stressed or unwell.
If you have a sick day plan then follow this. If your blood glucose levels are not within the target range or if you are unsure what to do then contact your healthcare team.
How to Improve Glucometer Accuracy
A glucometer is useful only when the device and testing technique are suitable for the task.
These practices can reduce avoidable errors.
- Use the correct strips: Only use test strips specified for your meter.
- Check expiry dates: Do not use expired or visibly damaged strips.
- Store supplies correctly: Protect strips from moisture, heat and other conditions listed in the instructions.
- Wash and dry your hands: Remove possible food residue and ensure your fingers are dry before testing.
- Use an adequate blood sample: Follow the meter’s instructions for the required sample size.
- Follow the device manual: Some meters have model-specific steps, checks or control-solution requirements.
- Check your meter when recommended: Use the manufacturer’s control solution and testing procedure when recommended to check that your meter and strips are working correctly.
- Keep the meter clean: Use only the cleaning method recommended by its manufacturer.
- Do not share your meter or lancing equipment: Sharing can expose people to bloodborne infections.
The U.S. Food and Drug Administration’s guidance on blood glucose monitoring devices explains factors that can affect safety and accuracy.
What if a reading seems wrong?
If the result seems unusual, ensure you tested with clean dry hands, the correct and unexpired test strip and the device instructions were followed. Test again with a new test strip.
If results still seem to be giving varying results, contact your healthcare professional or the manufacturer of the meter. Do not disregard symptoms or delay seeking urgent care if you are feeling very unwell.
How to Record and Use Your Results
Keeping a simple log will help you to get the most out of your readings.
You could include:
- Date and time of test
- Blood glucose reading and units
- Before or after meal?
- Any recent physical activity or unusual activity
- Any medications you have been taking
- If you are unwell or feeling stressed this could help to explain any unusual readings.
Try to identify trends over a few days. For example if you are having consistently high readings at the same time of day.
The reason for keeping track of your readings is to help you make informed decisions with your care team. It is not to put the blame on you or to alter your medication without appropriate guidance.
When Should You Contact Your Healthcare Provider?
If your levels are consistently higher or lower than your target range, you’re noticing any unexpected changes or are unsure what to do, speak to your healthcare professional.
Contact your healthcare professional if your readings are consistently higher or lower than your personal target range, if you notice unexpected changes, or if you are unsure how to respond. You should also report repeated low readings, especially if they occur suddenly, during exercise or overnight.
Low blood sugars can make you feel shaky, sweaty, dizzy and confused. In general, anything below 70mg/dL will be considered low. Follow the plan that you have been given to treat a low blood sugar.
If someone becomes unconscious, has a seizure or cannot swallow safely, seek emergency medical help. Do not give them food or drink by mouth.
Contact your healthcare professional if your blood glucose remains high when you are unwell, particularly if you are vomiting, struggling to keep fluids down or experiencing other concerning symptoms. Follow any sick-day instructions provided by your healthcare team.
Taking a log of your glucose levels to your appointments can help your healthcare professional to see any patterns and whether your care plan needs reviewing.
Frequently Asked Questions:
How often should I use a glucometer?
Everyone will have their own individual blood glucose monitoring routine. The frequency of testing will depend on what type of diabetes you have, what medication you are taking, risk of hypoglycaemia and what you are trying to achieve. Follow the recommendations of your healthcare professional.
Do I need to clean my hands before using my blood glucose meter?
Yes. It is recommended that you clean your hands with soap and warm water and dry thoroughly. Any food or sugar on your fingers can affect the reading.
Where should I test my blood?
The lateral surface of your fingertip is commonly used as this may be less painful. Rotate your testing site and follow the instructions provided with your meter.
Why isn’t my glucometer always giving the same reading?
Your blood glucose levels may fluctuate and this can be affected by how you perform the test, the state of the strips, amount of sample you are using, how they are stored and some health related factors. Ensure you are performing the test correctly and repeat where necessary. If you continue to have issues, please contact your healthcare professional.
Can I use my glucometer to diagnose diabetes?
No. Home blood glucose meters are not used to diagnose diabetes or pre-diabetes. They are used to assist with monitoring your blood glucose. A correct clinical blood test is needed to diagnose diabetes.
See the NIDDK’s guide to diabetes testing and diagnosis.
Can I lend my glucometer to a family member?
No. Home blood glucose meters and lancets should not be shared between people. This puts you at risk of blood borne infections. Ensure you use your own equipment and follow the guidelines provided for cleaning and disposing of equipment.
Key Takeaway
Learning how to use your glucometer properly will give you more accurate blood sugar readings. Make sure that your hands are clean and dry, use test strips that are compatible with your meter and have not expired, follow the instructions on your meter, keep a record of your results and discuss any patterns with your healthcare team.
Most importantly know what your target ranges are and when to seek help. Your glucometer is simply a monitoring device and does not replace medical advice, lab tests or your prescribed diabetes treatment.
References
- Centers for Disease Control and Prevention — Monitoring Your Blood Sugar
- American Diabetes Association — Check Your Blood Glucose
- S. Food and Drug Administration — Blood Glucose Monitoring Devices
- S. Food and Drug Administration — Getting the Most Out of Your Blood Glucose Meter
- National Institute of Diabetes and Digestive and Kidney Diseases — Diabetes Tests and Diagnosis
- Centers for Disease Control and Prevention — Treatment of Low Blood Sugar (Hypoglycemia)
Learn More About Our Standards

admin
All Posts