Rowing is a joint-friendly, whole-body workout that can help you improve energy, mood, and day-to-day glucose stability.
It recruits large muscle groups without pounding your knees or ankles. You can do it at the gym or at home, in sessions as short as five to ten minutes.
Small, frequent bouts add up and are surprisingly effective for smoothing post-meal rises.
Because rowing scales easily, beginners can start slow and progress safely.
With a bit of planning, you would build consistency without burning out. You would also learn to time sessions around meals and medications for predictable results.
This guide by BestDietarySupplementforDiabetics research team walks you through a practical, step-by-step plan you can start today.
Points Covered in this Article
- Why rowing helps with day-to-day glucose control
- The 8 trending long-tail keywords we’ll weave in
- Step-by-step routine (Steps 1–12)
- Technique quick-start (the four phases)
- A beginner week at a glance (Weeks 1–4)
- Smart timing around meals and meds
- Safety essentials (feet, joints, hypoglycemia)
- Progressing to intervals the easy way
- Strong closing takeaways
Why Rowing Helps with Day-to-Day Glucose Control?
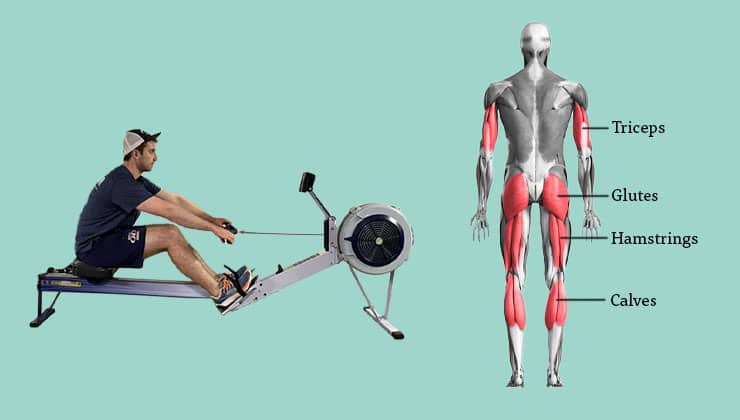
Rowing is rhythmic, low-impact aerobic work that trains the legs, back, hips, core, and arms together.
That full-body demand improves cardiorespiratory fitness and helps your muscles use glucose more efficiently during and after a session.
Because resistance is set by your pace and stroke mechanics, you can keep things comfortably easy on busy or low-energy days, then nudge intensity when you’re ready.
Short “micro-rows” right after meals can blunt sharp rises, and steady, conversational rows done most days build the fitness base that supports long-term A1C improvement.
Step-by-Step Routine
Let us walk you through this routine in a step by step manner for better understanding:
Step 1 — Get the Green Light and make a simple Glucose Plan:
If you use insulin injections for blood sugar control or sulfonylureas, talk with your clinician about how to reduce the chance of lows during and after exercise.
Set a comfortable pre-exercise range, keep fast-acting carbs nearby, and learn a simple response plan for dips.
If you are living with complications (neuropathy, retinopathy, foot ulcers), get personalized guidance so you can start confidently.
Step 2 — Choose and Set up your Rower:
Any reliable air, magnetic, or water rower works.
Set the damper lower than you think (on many air rowers, 3–5 is a good start) to emphasize smooth aerobic strokes over heavy pulling.
Adjust foot straps so the ball of your foot sits over the pivot point. Keep wrists neutral, grip relaxed, and spine long.
A comfortable setup makes a beginner rowing routine for diabetes feel sustainable from day one.
Step 3 — Learn the Stroke in Four Simple Cues:
Think “legs–body–arms” on the drive, then “arms–body–legs” on the recovery.
- Catch: Shins vertical, torso tall, arms straight.
- Drive: Push with legs, hinge open at the hips, finish with arms.
- Finish: Handle at lower ribs, shoulders relaxed.
- Recovery: Arms extend, hinge forward, knees bend last.
Smooth strokes keep heart rate under control and protect your back.
Step 4 — Find your Easy Zone and Stay there at First:
Start with zone 2 rowing for fat loss and glucose control—the pace where you can speak in full sentences and breathing feels steady.
If you track heart rate, this is roughly 60–70% of your max; if not, use RPE 3–4/10. This is your bread-and-butter intensity for most sessions in the first weeks.
Step 5 — Week-1 “Micro-Rows” to Build the Habit:
Row 5–10 minutes at an easy, conversational pace on 5–6 days this week.
If you sit a lot, add a 3–5-minute mid-day mini-row to break up long sedentary blocks. Habits form faster when the dose is tiny but frequent.
Step 6 — Add Meal Timing for Smoother Days:
Schedule two to four short sessions this week right after larger meals—about 10 minutes easy within 60–90 minutes.
This is classic post-meal rowing to reduce blood sugar: short, gentle movement when your body is processing food.
Step 7 — Scale toward Guideline Minutes (Weeks 2–3):
Bump most sessions to 15–20 minutes and keep one day with two short bouts (AM/PM) if that fits your schedule.
The goal is consistency across the week, not hero workouts. A steady rhythm of easy minutes wins.
Step 8 — Introduce Simple Intervals (Week 3+):
When 20–30 minutes easy feels solid, add one gentle interval day weekly.
Try 4–6 rounds of 1 minute “comfortably hard” (RPE 6/10) followed by 2 minutes easy.
As your base grows, you can explore rowing HIIT for insulin sensitivity—short, crisp efforts with generous recovery—to nudge fitness without spiking fatigue.
Step 9 — Let your Data Guide You (optional but helpful):
If you use a continuous glucose monitor, try CGM-guided rowing workouts. Notice how your trend looks pre-row, mid-row, and a few hours post-row.
If you tend to dip, shorten intervals, increase recovery, or add a small pre-session snack. If you tend to rise, extend the cool-down or schedule a brief post-meal row later in the day.
Step 10 — Blend in Strength and Mobility:
Two short strength sessions per week (squats to a chair, rows, presses, hinges, and light core) stabilize joints and improve your drive on the rower.
On days you lift, a gentle 10–15-minute finisher can be effective rowing after strength training for glucose—just keep it easy so you don’t stack fatigue.
Step 11 — Use Time-of-Day to Your Advantage:
Experiment with morning rowing for fasting glucose if you like early movement.
Many people find mornings simpler for routine and evenings better for short post-meal rows.
Choose what you will actually stick with, and adjust snacks or meds with your care team if needed.
Step 12 — Foot Care and Modifications for Comfort:
Row in supportive shoes and inspect feet daily.
If you live with neuropathy, keep strap tension comfortable, avoid barefoot sessions, and favor steady, moderate sessions—this is safe rowing with diabetic neuropathy.
If your lower back complains, shorten the stroke, slow the rating, and dial the damper down for a week while you refine technique.
>>> Want to Learn How I “Treated My Diabetes Naturally” at Home??? Click Here to Find Out! <<<
Technique Quick-Start: The Four Phases
- Catch: Sit tall, hinge slightly forward at the hips, shins near vertical.
- Drive: Push the platform away with your legs; keep arms straight until hips open.
- Finish: Lean back slightly (not a lounge), draw handle to the base of your ribs.
- Recovery: Arms extend first, then hinge forward, then knees bend.
Pro tip: Keep the recovery slower than the drive—think 1:2 work:rest rhythm at first.
A Beginner Week at a Glance
We can now explain this concept in a simply weekly manner. A quick look at how a typical week works:
Week 1 (Habit & Technique):
- Mon: 8 min easy steady — Learn the basic stroke and settle into a conversational pace; focus on smooth legs–body–arms timing.
- Tue: 10 min easy after dinner — A short post-meal row helps blunt the evening glucose rise; keep it relaxed.
- Wed: 8 min easy + 3 min “sit-break” mini-row — Add a tiny mid-day bout to break up sitting; technique first, power later.
- Thu: Rest or 10 min mobility — Gentle hip, hamstring, and thoracic mobility keeps strokes long and back-friendly.
- Fri: 10 min easy after lunch — Another post-meal “smoother”; breathe nose-in/mouth-out and keep strokes light.
- Sat: 10 min easy steady — Same easy rhythm; try a slightly slower recovery to groove efficiency.
- Sun: Rest — Full rest consolidates the habit and lets tissues adapt.
Week 2 (Build Minutes):
- Mon: 15 min easy steady — Add time, not intensity; keep talk-test comfortable throughout.
- Tue: 10 min easy post-meal — Use timing strategically on a higher-carb day if relevant.
- Wed: 15 min easy + 3–5 min sit-break — One longer session plus a short “movement snack” to cut sedentary time.
- Thu: 10 min easy post-meal — Repeat the glucose-friendly timing; same effortless feel.
- Fri: Rest or mobility — Prioritize hips and ankles; better range equals cleaner catches.
- Sat: 20 min easy steady — First 20-minute outing; aim for consistent split and relaxed shoulders.
- Sun: Rest — Keep recovery sacred to protect progress.
Week 3 (Intro Intervals):
- Mon: 20 min steady — Hold last week’s volume; cap intensity at conversational.
- Tue: 4–6×(1 min brisk / 2 min easy) ≈ 12–15 min total — Gentle surges to wake the system; perfect form, generous recovery.
- Wed: 10 min post-meal — Short, timely row to smooth midday glucose.
- Thu: Rest or mobility — Light stretching for hip hinge and rib mobility; no fatigue.
- Fri: 20–25 min steady — Build endurance softly; keep stroke rate moderate (e.g., 20–24 spm).
- Sat: 5–8 min easy post-meal — “Minimum effective dose” after a bigger meal or social eat.
- Sun: Rest — Let adaptations catch up before next week’s consolidation.
Week 4 (Consolidate):
- Mon: 25–30 min steady — Your longest easy row so far; pace control over heroics.
- Tue: 5×(1 min brisk / 2 min easy) — Repeat small intervals; stop while technique is still crisp.
- Wed: 10 min post-meal — Keep this as a reliable glucose smoother on busier days.
- Thu: Rest — Full rest to bank recovery and avoid niggles.
- Fri: 20–25 min steady — Second solid aerobic builder; watch posture late in the set.
- Sat: Optional 2×5-minute sit-break rows — Two tiny bouts to counter weekend sitting; low effort, high consistency.
- Sun: Rest — Review the week, note wins, and plan next week’s times.
Why this works: You are practicing “most days” without overload, layering volume before intensity, using post-meal timing to smooth spikes, and protecting recovery so technique stays sharp.
Smart Timing Around Meals & Meds
- After meals: Ten minutes easy within 60–90 minutes can flatten peaks.
- Before meals: A short, easy pre-meal row can “prime” muscles on higher-carb days.
- Evenings: If you’re at risk for nighttime lows, finish earlier or plan a small, balanced snack.
- Cold or hot days: Dial intensity down and lengthen the warm-up; hydration matters more than you think.
- Busy weeks: Pair two 7–10-minute rows (lunch and dinner) and call it a win—consistency first.
Safety Essentials (Worth Repeating)
- Hypoglycemia plan: Know your symptoms, carry fast carbs, and have a simple step-by-step response.
- Foot care: Supportive shoes, cushioned socks, and daily checks; stop if you see redness, hot spots, or blisters.
- Back-friendly rowing: Long spine, relaxed shoulders, and a controlled recovery; technique before power.
- Progress slowly: Add no more than ~10% time per week; keep most sessions easy in your first month.
- Complications: If you have proliferative retinopathy, active foot wounds, or recent severe hypoglycemia, get individualized clearance and modifications.
How to Progress to Intervals (When You are Ready)
When steady 25–30-minute rows feel comfortable 3–4 days per week, try one of these once weekly:
Option A — Intro Intervals (15–20 min):
- 5 min easy — Settle into smooth, conversational strokes (about 18–22 spm); keep grip loose and spine tall.
- 6×(45 sec brisk / 75 sec easy) — Brisk = controlled push (around RPE 6/10 or a touch faster than your easy split) at ~24–28 spm; recover truly easy to reset breathing and form.
- 4–6 min easy cool-down — Gradually dial the pace down to bring heart rate back to baseline and finish with clean, relaxed strokes.
Option B — Ladder (20–22 min):
- 5 min easy — Warm joints and groove timing (legs → body → arms); breathe steady.
- 1 min brisk / 1 min easy — A short pop to wake the system; stay crisp, not frantic.
- 2 min brisk / 2 min easy — Hold the same controlled effort; focus on strong leg drive.
- 3 min brisk / 2–3 min easy — Longest push; keep posture tall and strokes consistent—don’t chase pace.
- 2 min brisk / 2 min easy — Settle back to rhythm; maintain technique as fatigue creeps in.
- 1 min brisk / 2–3 min easy — Final tidy surge; finish feeling smooth, then coast down easy.
Option C — HIIT Taster (18–22 min):
- 5 min easy — Ease in, check foot straps, and keep rate low to conserve energy.
- 6–8×(30 sec hard / 90 sec easy) — Hard = assertive but repeatable (RPE 7–8/10), powerful legs and clean finishes; recover long enough to keep every rep sharp.
- 6–8 min easy — Unwind with light strokes; let breathing normalize and tension drop from shoulders.
Good Rules of Thumb: keep recoveries generous, stop the set if form breaks, and if fatigue piles up, swap the next interval day for a steady easy session.
FAQ-Style Quick Checks
- Knees or back feel tight? Lower the damper, shorten the stroke, and spend a week at conversational pace while you refine mechanics.
- No time? Two short post-meal rows still help—small, frequent wins beat rare heroic workouts.
- No erg at home? Use a gym rower, or on off-days walk briskly after meals; your routine stays intact and your habit stays strong.
Q-1: How can I safely begin a rowing routine if I have diabetes and have never exercised before?
A-1: Start by consulting your healthcare provider to ensure rowing is appropriate for your condition. Begin with short, low-intensity sessions (5-10 minutes) focusing on proper form to avoid injury. Gradually increase duration and intensity as your endurance improves, monitoring blood sugar levels closely before and after each session to prevent hypoglycemia or hyperglycemia.
Q-2: What specific benefits does rowing offer for managing blood sugar levels in diabetes compared to other exercises?
A-2: Rowing uniquely combines aerobic and resistance training, engaging both upper and lower body muscles simultaneously. This full-body workout enhances insulin sensitivity more efficiently, helping regulate blood glucose levels. Additionally, its low-impact nature reduces joint strain, making it accessible for people with diabetes who may have mobility issues or neuropathy.
Q-3: How often should I row each week to see meaningful improvements in my diabetes control?
A-3: Aim for 3 to 5 rowing sessions per week, each lasting 20 to 30 minutes at moderate intensity. Consistency is key to improving insulin sensitivity and cardiovascular health. Incorporate interval training by alternating periods of higher intensity with rest or lower intensity to maximize benefits without overwhelming your body.
Q-4: What precautions should I take during rowing to avoid blood sugar complications?
A-4: Always check your blood glucose before starting and have a quick source of carbohydrates nearby in case of hypoglycemia. Stay hydrated and avoid rowing immediately after insulin administration or heavy meals to reduce the risk of low blood sugar. Wear appropriate footwear and maintain good posture to prevent injuries.
Q-5: How can I adapt my rowing routine if I experience diabetes-related complications like neuropathy or fatigue?
A-5: Modify your rowing intensity and duration to accommodate your symptoms. Use a rowing machine with adjustable resistance to reduce strain and take more frequent breaks. If neuropathy affects your feet, ensure proper foot support and consider consulting a physical therapist for personalized adjustments. Prioritize rest and listen to your body to avoid overexertion.
Takeaway
You do not need perfect conditions to get started—just a plan that fits real life.
Keep most rows easy, add a handful of short post-meal (include chromium to reduce blood sugar naturally) sessions, and build minutes gradually.
Use simple data—how you feel, your logs, and any glucose readings—to fine-tune timing and effort.
Protect your feet, relax your grip, and let technique—not force—drive every stroke. On busy days, five minutes counts; on great days, twenty easy minutes beats one all-out grind.
When steady rows feel natural, sprinkle in small intervals to nudge fitness and insulin sensitivity.
Over a few consistent weeks, you will feel the difference in energy, sleep, and day-to-day readings.
Rowing is low-impact, scalable, and time-efficient—exactly what sustainable diabetes care looks like.
References:
admin
All Posts